Monday, 4 May 2020

10 Beautiful HTML CSS Sign up & Login Form Templates


Beautiful  css3 sign up & Login form Layouts are necessary for website. Learn more about the  css3 and HTML5 templates. In this article we will provide you some examples of css3 html5  form layouts, these templates are totally free for download and you can feel free to edit these templates with your own choice. It will help you to save your time, when you are building a website.
Various types of registration forms that you add in your website to allow user to connect with your community and having permissions to download and get more features of your website. 

1. Sign Up Form Payment with Details


See the Pen Sign Up Form by usama abbasi (@saamiiabbasi007) on CodePen.


2. Interactive Sign Up Form


See the Pen Interactive Sign Up Form by usama abbasi (@saamiiabbasi007) on CodePen.


3. Material design sign up form


See the Pen Material design sign up form by usama abbasi (@saamiiabbasi007) on CodePen.


4. Pogorammer sign up form


See the Pen Spectre sign up form by usama abbasi (@saamiiabbasi007) on CodePen.


5. Material Design Signup Interaction


6. Sign Up Form using Material Design on Angular Material


See the Pen Material Design Sign Up Form by usama abbasi (@saamiiabbasi007) on CodePen.


7. Login Form using Material Design


See the Pen Material Design Login Form by usama abbasi (@saamiiabbasi007) on CodePen.


8. HTML5 Sign Up Form


See the Pen Sign Up by usama abbasi (@saamiiabbasi007) on CodePen.


9. Simple and light sign up form


See the Pen Simple and light sign up form by usama abbasi (@saamiiabbasi007) on CodePen.


10. CSS3 Sign Up for Free


See the Pen Sign-Up/Login Form by usama abbasi (@saamiiabbasi007) on CodePen.

Saturday, 2 May 2020

5 Open Source UI Layouts Calendar with Css


1. Calendar Widget:


See the  code on CodePen.


2. Colorful UI Calendar:


See the code on CodePen.


3. Flat Fullscreen Calendar:


See the Pen Full Screen Flat Calendar by usama abbasi (@saamiiabbasi007) on CodePen.


4. Flip Calendar:


See the Pen Calendar Flip Animation by usama abbasi (@saamiiabbasi007) on CodePen.


5. Dark UI Responsive Calendar:


See the Pen Responsive Calendar by usama abbasi (@saamiiabbasi007) on CodePen.

Saturday, 11 April 2020

JAVASCRIPT PROJECTS


JAVASCRIPT MINI PROJECTS:

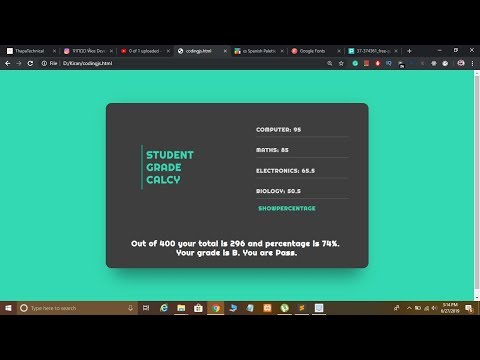
Welcome, to Javascript Project in Urdu/Hindi. JavaScript Mini Project Student Grade Calculator in JavaScript in Urdu/Hindi with Code.

Believe me all this money will be used to make more quality videos and to make my channel grow. So that I can always provide you awesome free videos :)


SOURCE-CODE:

Click Here: contact us. in inbox


Sunday, 5 April 2020

Removing person from video with artificial intelligence by using pure Java Script:

Removing person from video by using pure Java Script:


For removing a person we use javascript for make it simple and easy. Actually this is Artificial Intelligence, so we use artificial intelligence for removing person by javascript.

We use AI in javascript so you will also get knowledge about, how to use AI in javascript.

Here is the HTML:

<!DOCTYPE html>
<html>
<head>
  <meta charset=UTF-8 />
  <link rel="stylesheet" type="text/css" href="styles.css" />
</head>
<body>
  <video id="video" width="800" src="video.mp4" muted loop controls></video>
  <canvas id="output-canvas" width="800" height="450"></canvas>


HERE IS THE JAVA SCRIPT
<script> let video, c_out, ctx_out, c_tmp, ctx_tmp, model; const bodyPixConfig = { architechture: 'MobileNetV1', outputStride: 16, multiplier: 1, quantBytes: 4 }; const segmentationConfig = { internalResolution: 'high', segmentationThreshold: 0.05, scoreThreshold: 0.05 }; function init() { video = document.getElementById("video"); c_out = document.getElementById("output-canvas"); ctx_out = c_out.getContext("2d"); c_tmp = document.createElement("canvas"); c_tmp.setAttribute("width",800); c_tmp.setAttribute("height",450); ctx_tmp = c_tmp.getContext("2d"); video.play(); computeFrame(); } function computeFrame() { ctx_tmp.drawImage(video,0,0,video.videoWidth,video.videoHeight); let frame = ctx_tmp.getImageData(0,0,video.videoWidth,video.videoHeight); model.segmentPerson(c_tmp,segmentationConfig).then((segmentation) => { let out_image = ctx_out.getImageData(0,0,video.videoWidth,video.videoHeight); for(let x=0;x<video.videoWidth;x++){ for(y=0;y<video.videoHeight;y++) { let n = x + (y * video.videoWidth); if(segmentation.data[n] == 0) { out_image.data[n * 4] = frame.data[n * 4]; //R out_image.data[n * 4 + 1] = frame.data[n * 4 + 1]; //G out_image.data[n * 4 + 2] = frame.data[n * 4 + 2]; //B out_image.data[n * 4 + 3] = frame.data[n * 4 + 3]; //A } } } ctx_out.putImageData(out_image,0,0); setTimeout(computeFrame,0); }); } document.addEventListener("DOMContentLoaded", () => { bodyPix.load(bodyPixConfig).then((m) => { model = m; init(); }); }); </script>
</body>
</html>
PLUGINS WILL BE USE HERE

Plugins:

These are the plugins that we use to make a rgba layer over the person.

Tensorflow:

 <script src="https://cdn.jsdelivr.net/npm/@tensorflow/tfjs/dist/tf.min.js"></script> 

<script src="https://cdn.jsdelivr.net/npm/@tensorflow-models/body-pix@2.0"></script>


AND HERE IS THE SIMPLE CSS FOR ALIGN THE BODY:


body {
  width: 100vw;
  height: 100vh;
  margin: 0;
  display: flex;
  align-items: center;
  justify-content: center;
  background-color: rgb(36, 36, 36);
}
You can also get source code by click here.